All the essential documents like the Aadhar card, Pan card, offer letters and others can be uploaded and saved in the Office Portal’s cloud azure system. The HR need not maintain the hard copies of any documents.
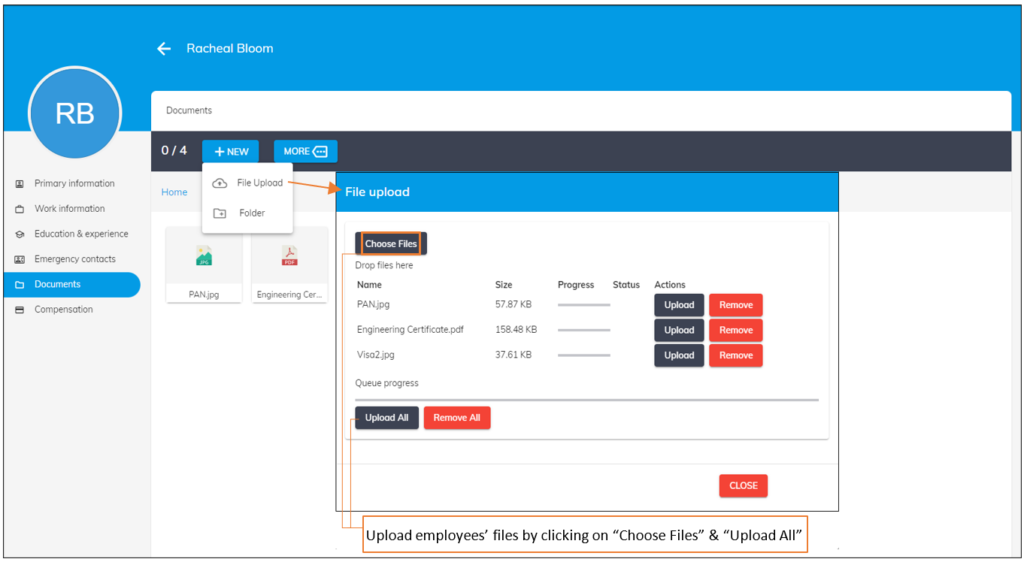
- Click on the “New button” and click on the “File upload” option to upload the file directly.
- Click on Choose files and select the documents to upload.
- “As soon as you select the documents”, you will see two options — > upload/upload all. You can click on “Upload option” to upload a single file or click on “Upload All option” to upload multiple files together. In the same way, you can remove the uploaded files individually or all of them together.
2. Click on the “New button” and click on the “Folder” option to create a folder and group all the documents under the folder. Once the folder is created, just double tap on the folder to open the folder. Now, follow the same steps mentioned in the point 1.
Once the documents are uploaded, you can
view the document info, download or delete the documents
. Once the documents are uploaded, they are stored with encryption and are secured. No third party will have access to download these documents. These can be downloaded from OfficePortal by the employee or reporting manager, or HR whenever required (based on role access)

Shortcut Keys for Managing Uploaded Documents
OfficePortal makes it easy to manage your uploaded documents using simple keyboard shortcuts. Here’s how you can quickly take actions:
- Rename a Document:
Select any uploaded document and press F2 to rename it instantly. - View Document Info:
Choose a document and press F4 to view its details, such as file name, size, and upload date. - Preview a Document:
Select a document and press the Enter key to open a quick preview. - Delete a Document:
Press the Delete key to remove the selected document from the list.
These shortcuts help you manage files faster without using a mouse.